Vinegarizing cider is an annual fermentation project in our home, as is apple-pressing to produce that cider. Cider vinegar at the store, especially the kind that still contains all the wonderful nutrients and constituents the organic, mother-in, raw, unfiltered, unpasteurized cider vinegars contain, is expensive. In some areas, it can be hard to find. So, for the practical herbalist, vinegarizing cider is a good, sound, and wise investment in time and equipment.
 For those folks who don’t press apples at home and don’t make an annual pilgrimage to their local apple orchard or farmer’s market for freshly-pressed cider, commercial cider can suffice. Be sure the cider you purchase, whether it’s directly from the farmer or from the supermarket shelf, is unpasteurized (which kills some of cider’s nutrients, although doesn’t necessarily prevent you from fermenting good vinegar) and that no chemicals have been added to prevent it from fermenting.
Fermentation is an important aspect of the vinegarizing process and can get started all on its own quite easily. Frozen cider is less likely to have added chemicals than is bottled cider. In either case, read the label carefully.
Be aware, too, that the experts advise home vinegar-makers to either test the acidity of their vinegar or to use only commercially-produced vinegar for home canning and pickling. You can purchase an acid test kit from home wine-making and brewing shops that will give you an accurate enough reading if you wish. Most experts advise home canners to use vinegar rated at 5% acidity or more, so that’s the percentage you’ll be looking for when you test yours. I have not actually tested my cider vinegars and I have used them in canning, pickling, and for herbal infusions. It’s a risk I have been willing to take and thus far I have not regretted it. Prudence requires me to advise others to not do the same. I leave it to you to make a responsible choice that fits your lifestyle, comfort, and safety concerns.
I have included a very simple, unscientific process for turning cider into vinegar. My process is based on the information I found on these two sites and has served me well for many years:
Cider Vinegar Making Tutorial
This is a basic procedure, not a recipe. I haven’t included specific measurements but have instead described the process and what to look for as you’re working. For specific recipes using cider vinegar, see The Practical Herbalist® Recipes.
Equipment you’ll need to turn apple cider into vinegar:
- An open container made of non-reactive material, such as food-grade plastic or glass
- A towel or another way to let air in and keep flies out
- A non-reactive, food grade plastic spoon for stirring your cider vinegar daily
- Enough bottles with covers to store your finished vinegar.
Ingredients for making cider vinegar:
- Cider
- Starter (such as a yeast or an unfiltered, raw vinegar that contains the mother-of-vinegar)
Procedure for making cider vinegar:
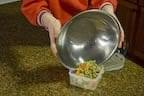
- Pour your cider into a clean, open container.
- Add a quantity of starter. I use wine-making yeast because I generally have yeast-starters ready to go in the fall. You can use ale yeast as well. Do not use bread yeast. I have tried using raw, unfiltered vinegar that contains the mother-of-vinegar as well, but I find that the fermentation process begins more quickly with yeast.
- Stir the cider and starter well.
- Cover your container with a cloth, towel, or another means that will allow air to get in and will keep flies out.
- Stir your cider daily, or as close to daily as you can manage. Keep it in a convenient, room temperature place. If the environment is too cool, it will take longer to ferment and turn to vinegar or may not do so at all. It will take several weeks, sometimes as many as two or three months, for your cider to become vinegar. I generally watch, smell, and taste to determine when the vinegarization process is complete. When it looks like vinegar, smells like vinegar, and tastes good and tart, it’s probably done. If you’re not sure, you can always let it stand another week or two after you think it’s done to see if it grows more tart.
Bottle Your Cider Vinegar
When your vinegar is done, you can bottle it, cap it, and store it in a cool, dark place. I store mine on the pantry shelf in canning jars capped (but not canned) with canning jar lids and rings. I don’t filter mine, but I also pour gently so as little of the sediment as possible ends up in my jars. Sometimes, I let my jars stand a week or two then pour the clear vinegar off into clean jars and put them back on the shelf. Once in awhile, I encounter a jar that has begun to ferment anew. I open the jar to release the pressure then recap it daily until the vinegar settles down again.
Many experts will advise you to pasteurize your vinegar. Others will advise you to use glass jars and non-reactive lids. Some may advise you to store unpasteurized vinegar in a refrigerator. All of this is to prevent further fermentation and spoilage. I do not deny the wisdom of this advise, although I also don’t necessarily follow it. Again and as always, make the choice that best fits your lifestyle, comfort, and safety concerns.