An herbal vinegar is a vinegar that has been infused with one or more herbs. In my home, vinegars infused with berries, barks, and pretty much any other form of edible plants count as Herbal Vinegars.
Vinegars extract the properties of herbs well, especially herbs that are high in alkaloids. Vinegar is a great preservative, too. Once you’ve strained the plant material out of your vinegar, it’ll have a long shelf-life, potentially extending for years. For those who are uncomfortable with using alcohol in any form, vinegar offers a very good alternative to delivering the healthful properties of the chosen herbs in a tincture-like form that, of course, contains no alcohol. And, vinegar is easy to use. It is used as the basis for many salad dressings, pickles, relishes, and a tablespoon or so in a glass of cool water makes a very healthy and refreshing drink on a hot day.
I recommend using Organic vinegars whenever possible, especially for medicines. But, when organics have not been available or were too expensive, I’ve used non-organics, too. For edible vinegars, I strongly recommend using a vinegar other than distilled white vinegar, mainly because distilled white vinegar doesn’t taste that great but also because many distilled white vinegars are made with chemical processes and so don’t feel as wholesome to me as do vinegars made from apples, grapes, or other fruits. Although I’ve used distilled white vinegar to make herbal vinegars strictly for household cleaning use, I prefer to use edible vinegars when I can. I like applecider vinegar a lot because it’s fairly inexpensive and I like the flavor.
You can begin with fresh herbs or dried. I’ve used both. I like to use fresh whenever they’re available, but I’ve made good herbal vinegars from dried, organic herbs, too.
There are two basic methods for making an infused vinegar, one that uses heat and one that does not. I’ve had much better results from the cold infusion, so that’s the procedure I’ve provided. The one that uses heat is similar to the procedure for using heat to infuse an oil. See The Practical Herbalist General Procedures for more information on making an infused oil using the heat method.
Herbal Vinegar Making Tutorial
This is a basic procedure, not a recipe. I haven’t included specific measurements but have instead described the process and what to look for as you’re working. For specific recipes using this technique, see The Practical Herbalist Recipes.
Equipment you’ll need to make an herbal vinegar:
- A cutting board and sharp knife (if you’re using fresh herbs)
- A glass jar with a tightly-fitting lid (or a similar jar made from a non-reactive material)
- A blender (optional)
- A rubber scraper or spatual, preferably one made of a material that can be thoroughly cleaned and does not hold any odors, such as a heat-proof plastic one
- A label for your jar
After the vinegar has infused, you’ll need:
- A straining bag or several layers of cheese cloth and a strainer
- A bottle for the finished vinegar
- A label for your bottle
Ingredients for making an herbal vinegar:
- A quantity of herbs or plant material, fresh or dried
- A good-quality, edible vinegar
Procedure for making an herbal vinegar:
Prepare your herbs. If you’re using fresh herbs, you will need to clean or shake any dirt from them, although unless they’re really, really dirty you do not need to wash them with water, and you’ll need to chop them. If you plan to use a blender (see step 4), then you’ll only need to chop them roughly, but if you do not intend to use a blender, chop them as finely as you can. If you’re using dried herbs, you will need to crush them as finely as you reasonably can.
- Place the herbs into your jar. Pack them down gently and fill the jar about three-quarters of the way full with the plant material. You need to leave enough room to fill the jar with vinegar, to have room to shake the contents regularly, and to let the vinegar penetrate through all of the plant material. If you’re using roots or barks, you can fill the jar only about a third to half-way full.
Pour the vinegar over the herbs, filling the jar until you’ve covered the herbs by just under a quarter of an inch, or if you’re using barks or roots fill the jar until it’s about three quarters or so full.
- Blend the mixture until it’s smooth like a smoothie, then return it to your jar. (This step is optional and not recommended if you’re using berries that are soft, such as strawberries or blackberries, or if you’re using dried or hard herbs, such as dried roots, barks, or seeds.)
- Cap your jar tightly.
- Label the jar and store it in a cool, dark place. A cabinet where you’ll see it each day is ideal.
- Shake the jar daily, even several times a day. This is highly recommended, although I’ve forgotten to shake jars for weeks and still have had good results.
After two to eight weeks, strain the herb material from the vinegar. Your vinegar should smell and taste of the herb. As you strain it, be sure to squeeze out as much of the vinegar from the plant material as you can. I like to use a small, fine-mesh brewing bag to strain mine, but several layers of cheesecloth and a good strainer will work well, too.
- After you’ve strained the vinegar once, wash the original jar and return the vinegar to it. If the vinegar was weak (tasted less of herb than you desired), now is the time to add more herb. If this is the case, let it stand another few weeks, then strain it again. If not, cap the jar tightly and let it stand for a few hours or overnight so any remaining sediment will fall to the bottom of the jar.
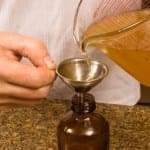
Once the sediment has all settled, carefully pour the clear vinegar from the jar into your bottle. The sediment won’t harm the vinegar, although it will make it cloudy and potentially could eventually contribute an off-taste to it.
- Label your jar and store it in a cool, dark place. Be sure to include the date, the kind of herb you infused, and uses so others will also know how to use it.


