A salve is a combination of soft oils and a hardener, such as beeswax or petroleum jelly. The beeswax or hardener makes the oils more workable and less sloppy to apply. Most recipes for salves ask for 1 part beeswax per 3 parts oil. These are measured by weight not by volume. Adding more oil will make the salve thinner. Adding more beeswax, makes the salve thicker. Essential oils or vitamin E oils are added at the end of the process as a preservative. This is important since all oils can go rancid over time.
Many lip balms, cold and flu chest rubs, and sore muscle or joint rubs are, in essence, salves. The advantage to turning botanical oils into salves is salves are easier to carry, less messy, and offer the convenience of transportation in a greater variety of containers. Recycled lipstick tubes, reused jelly jars, and even former candy or lozenge tins make great salve containers for pocket or purse. Just check the seal is still tight so you don’t have an unpleasant surprise at the end of the day.
Reuse, Recycle Salve Containers:
- Lipstick Tubes
- Jelly Jars
- Candy Tins
- Lozenge Tins
- Lip Balm Tubes or Tins
We recommend using beeswax as your hardener. Beeswax has many healing properties of its own, which enhances the quality of your salve, and it is a natural ingredient. Many chemical-based hardeners, like petroleum jelly, can clog the pours and don’t penetrate the skin well, which detracts from the salve you’re making rather than enhancing it.
Three Basic Types of Salves
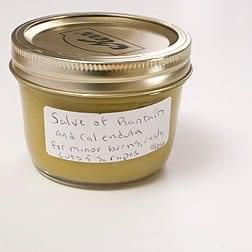
There are three basic types of salves: A simple infused oil salve, a base-oil salve, and a complex infused oil salve. The simple infused oil salve is made of one or more infused oils. Plantain Oil Salve is one example of an infused oil salve for soothing skin irritations and healing minor cuts and wounds. The base-oil salve is a salve made of plain, base oils which will become a carrier for essential oils. A cold and flu chest rub is an example of one way to use a base oil salve. The complex infused oil salve really isn’t that complex; it’s an infused oil salve to which one or more essential oils are added. Many Sore Muscle Rubs are complex infused oil salves.
Salve Making Tutorial
This is a basic procedure, not a recipe. I haven’t included specific measurements but have instead described the process and what to look for as you’re working. For specific salve recipes, see The Practical Herbalist Recipes.
Equipment for Making a Salve
- A pot that’s large enough to hold all the ingredients and still leave a goodly sum of stirring space
- A vegetable peeler or grater if your beeswax is not grated
- A spoon for stirring, preferably one that has not been used for cooking foods or one made of a material that can be thoroughly cleaned and does not hold any odors, such as a metal or heat-proof plastic one
- A spatula or scraper, preferably one that has not been used for cooking foods or one made of a material that can be thoroughly cleaned and does not hold any odors, such as a metal or heat-proof plastic one
- A glass jar or other container in which to keep your finished salve
- A label for your jar
Ingredients for Making a Salve
- A quantity of soft oils, these may be infused with herbs or plain
- Beeswax or a similar wax or hardener
- Essential oils (optional)
- Vitamin E oil (as a preservative, optional)
Procedure for Making a Salve

- Add the oils to your pot. Be sure to leave enough space in the pot so you can easily stir the mixture once you’ve added the beeswax.
- Gently and slowly heat the oil.
- Add the beeswax a little at at time, stirring until it melts.


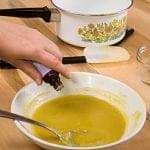
- When the beeswax has melted thoroughly, test a small amount of the salve by dropping a few drops onto a plate or spoon rest. When the drops cool, which should happen fairly quickly, the texture should be like a soft but spreadable butter and it should be fairly opaque rather than very translucent or very waxy.You can make it more or less stiff, depending on your intended application. Add more beeswax to make the salve stiffer or harder. If you are putting salve into lip balm containers, add more wax so it retains its shape when you open the top. Add a little more oil to make the salve more loose or soft. This consistency is perfect for adding to delicate areas where “spread-ablity” is priority such as diaper rash balm.
- Take the pot off the heat once the beeswax is completely melted and you’re happy with the texture. As the salve cools, stir it frequently to prevent the beeswax and oils from separating.
 Once the salve is nearly completely cooled, you can either transfer it to your container or jar using a scraper or spatula to get every last bit out of the pot, or you can add your essential oils.Be sure the salve is just cool enough to stir before adding essential oils; if the salve is still warm the essential oils are more likely to evaporate. If you intend to add Vitamin E oil as a preservative, now is the time do do so. After you’ve added the essential oils to your liking and the Vitamin E oil, transfer the salve to your jar and cap it.

- Label your jar. Include at least the name of your recipe or the ingredients and the date. It can also be useful to include a short list of uses for your salve; this makes it easier for others in the family to identify the right salve to use if you’re not available or able to direct them toward it yourself. And, in an emergency, it makes identifying the best healing-agents to use easier for everyone.